It’s no secret that I love to build Dnn sites in Azure Websites. I’ve posted on how to install Dnn on Azure Websites, Launch a Dnn site on Azure Websites and how to Move an existing Dnn installation to Azure Websites. These three articles are all you need to get up and running fast and to start to delve into some of the other great features.
Assuming you’ve followed some of these instructions, you might find yourself faced with a task that is ordinarily simple when using a traditional hosting environment, but suddenly becomes tough.
I came across one of these the other day – the file usage had jumped all of a sudden – but where was the issue?
In Windows, I’d just run a search and sort by size, or maybe do a search for files over a specific size. But there is no option to do that in Azure Websites. Another approach is needed.
Finding large Files in an Azure Website
The key to doing this task is using Visual Studio Online – you need to first activate this for your Website before you can use it.
If you need to add the extension, use the new Azure Portal to go to your Website, choose Extensions, and then add Visual Studio Online as an extension.
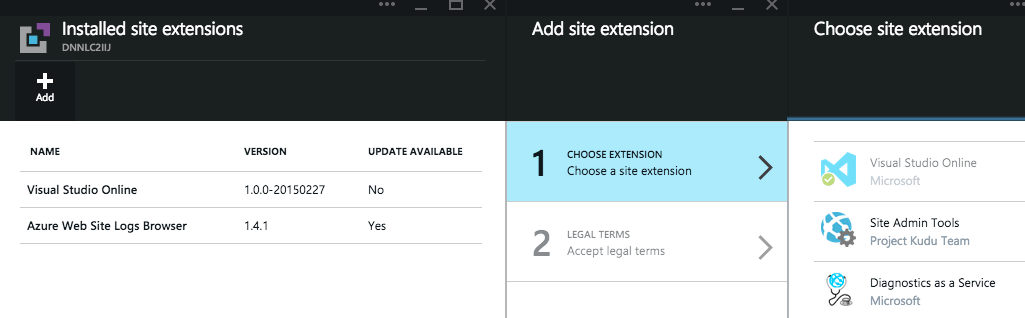
Note that running Visual Studio Online does take up some of your available resources so if you’re not going to use it for a long time you can disable it again.
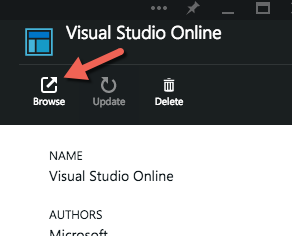
Once it’s been added, you can then browse to the Visual Studio Online URL and open the editor.
The editor will load in a new window, and show a list of files/folders for your site. Any file you click on is edited and saved immediately – so don’t start messing with things for fun and be careful.
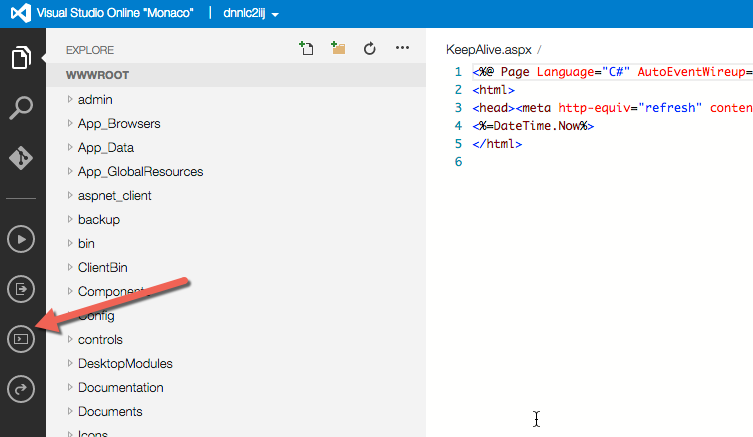
One thing you’ll notice is that the file/folder list doesn’t include any file sizes. So that’s not going to help us find a big file if we don’t know what we are looking for.
However, we do have access to the ‘console’ which is a DOS-like console app. I say DOS-like because there is only a subset of resources. Happily the evergreen dir command is available, and it gives us files – in byte size, mind you, harking back to the days when files generally did consist of bytes and not gigabytes.
Here is where it gets fun. What we are going to do is combine the dir command with redirected output to a text file, then use the native Visual Studio Online file editor to find the big ones. It’s easy to do:
Step 1 : Issue this command in the command prompt : dir *.* /s > filelist.config
This does a recursive listing of all files and redirects the output to a text file, which we are calling filelist.config. Why end the file with .config? Because that is a reserved file extension that ASP.NET will not serve if requested – it wouldn’t be a good idea to dump a listing of our files into ‘files.txt’ which might be easy to request from the server.
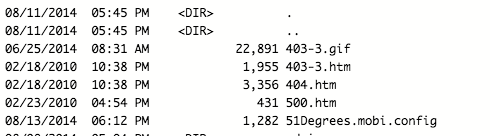
Step 2 : Find the filelist.config file in Visual Studio Online and click on it, so it opens in the editor

Step 3 : Find the big files by using the ‘Find’ function with a regex filter.
You can open the ‘find’ function with Ctrl-F in the browser while the filelist.config file is opened in Visual Studio Online. Click on the little regex icon [.*] in the find popup, then write your Regular Expression:
- To find files of 10 Mb or more : \d{2,3},\d{3},\d{3}
- To find files of 1GB or more : \d{1,3},\d{3},\d{3},\d{3}
- To find files of 10GB or more : \d{2,3},\d{3},\d{3},\d{3}
This works by matching the comma separated thousands in the directory output. Remember that 1 Megabyte = 1,000,000 Bytes and 1 Gigabyte = 1,000,000,000 Bytes. To find the right size, it’s just a case of matching the commas and digits, which is what the above patterns do.

The large file is highlighted (ok, so I intentionally put it there so it would show up). The regex pattern in the search box is shown on top of the image.
Step 4 : Deal with the big files.
Using this process, I’m quickly able to identify where big files and folders are in the installation. This leads me directly to a 313 Megabyte file in my ‘downloads’ folder. Now I can easily fix that issue by deleting the oversized file and every thing is OK. Note that this process also works for folders because the DOS ‘dir’ command also summarizes the size of each folder it iterates through.
If you try this out, don’t forget to delete your ‘filelist.config’ file at the end of the process – no need to waste disk space with a static copy that will soon be out of date.
Hope this helps someone with an inexplicable increase in storage so they can find big files and start trimming them down.