Visual Studio 2012 Support
The information below is available for use with older templates that were designed for Visual Studio 2008/2010. There are new templates available for
Visual Studio 2012.
Visual Studio 2010 and earlier
As part of your DotNetNuke Module Development you may find that you want to create simple projects that all start with the same configuration options, you can do this with the standard projects in Visual Studio, or you can automate a lot of that using a VS Template. On this page we will discuss how to customize those templates to fit your needs with company name, namespace, email, and URL. Once you've customized the template you can
install development templatesIf you haven’t read the entry about
Setting up your Module Development Environment you should do so before proceeding, as the steps I’m going to walk you through below assume you are running a similar environment. The following assumes you are using DotNetNuke V5+ and Visual Studio 2008, if you are using an older version of DNN and Visual Studio there are no guarantees that this template will do anything for you except cause pain. It’s time to upgrade folks! DNN 5 rocks!
Background for this page
The Visual Studio Template discussed in this page is designed using the WAP model, web application project. This means that your module will be compiled into it’s own DLL, with a simple reference to the DotNetNuke DLL(s). You do not open up the source code of DNN, there is no need, you can easily debug your module, package your module, and deploy your module using this template and the methods discussed in this and the other blog posts in this series. There are other ways to do DNN module development, and other tutorials on how to do module development, but this is the method I choose to use in my own development, and the one I show to people when they are having problems getting their head around module development in DNN.
Template Requirements
In order to use the template discussed below you will first need to install the MSBuild Community Tasks project available from
https://github.com/loresoft/msbuildtasks/downloads. Once you have downloaded the MSI file, execute that file to install the MSBuild Community Tasks files.
Intro to Visual Studio Templates
If you’ve never use a visual studio template in your development in the IDE you are missing out! Custom templates are a great way to get specific project types up and running quickly. Installation of these templates is easy, and if you feel like digging into them further than we are going to do in this blog, you can really create some cool templates. The template we are discussing today can be found at
http://christoctemplate.codeplex.com, in a later section I’ll actually talk about downloading and using the files, but for now I’ll provide an overview of why the template exists and what it provides.
The template discussed here includes a basic shell for creating a DNN module, you get three different User Controls (ASCX files) one for View, one for Edit and one for Settings. These user controls inherit from specific base classes, which themselves inherit from base classes that DotNetNuke itself provides for modules to use, PortalModuleBase and ModuleSettingsBase. In addition to the ASCX files there are Localization files, .RESX files in the app_localresources directory that DNN will utilize for localizing strings within your module.
By utilizing these templates in your Module development you can easily get a project up, compiling and even packaged (packaging with NANT will be discussed in a blog post later this week) within seconds. With a few minor changes to the project file you can easily get your module running within your DotNetNuke website and debugable. There are some additional files within the template for the Manifest information for DNN, a BUILD script for packaging with NANT, and even a stub’d module.css file. The module that gets created with this package doesn’t have any functionality in terms of displaying information or interacting with the user controls, it wasn’t intended to provide functionality out of the box, but it does provide a great launching point for starting your development for DNN.
Downloading the Visual Studio Template
Downloading and using the template is fairly straight forward, you can go to the project page at
http://christoctemplate.codeplex.comhttp://christoctemplate.codeplex.com/, click on the releases link on the side of the page and you can download the template, it comes as a ZIP file.
Customizing the Visual Studio Template
Templates are really pretty easy to customize, and I’ve tried to make this one easier than normal with the instructions here. Out of the box this template will create a module with the namespace of com.christoc.dnn.PROJECTNAME, an email address of modules@christoc.com, website of http://www.christoc.com/ and a company name of Christoc.com. When you create a project all of this information will be spread throughout the files for that project. So rather than you going out and spreading christoc.com love around you can modify these four settings prior to installing the template.
To customize the template you do need to open this ZIP file up, the file you are going to customize is "Christoc.com C# Compiled Module.vstemplate". I recommend extracting the contents of the ZIP file somewhere on your local computer. Once you extract the contents of the ZIP package navigate to the folder where the extracted files exist and open the VSTEMPLATE file in NotePad or some other text editor. If you open up this file you will see some comments in the 27 lines of the file, the comments are wrapped with these comments point out locations in the VSTEMPLATE file that you can customize to match your company name, email, url, and name spaces.
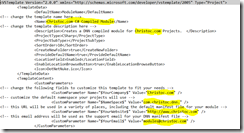 |
Customization is as easy as modifying that file, saving the changes, and then repackaging the ZIP file. Repackaging the ZIP file is up to you, but I prefer to press Control-A in the folder where all the extracted files are, right click on the VSTEMPLATE file and choose Send to Compressed (zipped) Folder, if you right clicked on the VSTEMPLATE file the ZIP file will be called “Christoc.com C# Compiled Module.ZIP”, you can also change the file name before creating the ZIP file in order to give it a different name. Now that you have a new ZIP file with your custom changes you can proceed on to the next step in the process, installing the template.
Installing the DotNetNuke C# Module Visual Studio Template
Installing the Visual Studio Template is fairly straight forward. You should close all instances of VS2008, then copy the ZIP file, either the one you downloaded from Codeplex, or the one you customized in the previous steps. You are going to paste this ZIP file into a very specific folder. Visual Studio Templates by default are stored in your My Documents\Visual Studio 2008\Templates folder. Within that folder you should go into ProjectTemplates\Visual C#\Web folder. If you don’t have a WEB folder within the Visual C# folder you can simply create a new folder.
Here’s a screenshot of my web folder with the template installed.
Notice that the path for this location is highlighted in yellow. It was that simple, you now have the visual studio template installed and ready for you to use.