
Recently, I came across a Search Engine Watch article titled "10 SEO Considerations for a Content management System." Being
in the business of building software to deliver content, this article was a
must-read to see if our solutions matched up with this list. I’m
pleased to say that
all points are met, and this post will show how for each one, along with some bonus tips as well.
The list of ten items concentrates on the ability to optimize "on page"
factors: those tweaks and optimizations which are within control of the
software, rather than optimizations done outside of your own site, such as
getting quality links from other sites.
Here are ten ways DNN can improve the SEO of your site.
1) Customizing Page Titles and Meta Data
There are
several key fields that search engines use in
their ranking algorithms:
page title (that’s the text you see in
the title bar of the browser),
meta description (that’s text describing your
page to search engines, which your visitors don’t normally see) and
‘H’ tags,
which are your H1/H2/H3 tags denoting which are the headers in your content.
LEARN MORE: SEO capabilities in Evoq Content
I disagree with the content of the Search Engine Watch article
that suggests needing to modify the Meta Keyword tag. From all evidence I have
seen, modern
search engines simply ignore the contents of the Meta tag.
How you do this in DNN:
The page title and description are stored in the Page Settings. Simply open
up the page settings for the current page, and you can edit these directly. Here’s the steps:
- Login as an Administrator, then go to the ‘Edit
Page’ drop down on the top right hand side of the screen.
- Choose ‘Page Settings’ from that menu, and it will load up the settings for
the page you’re currently browsing.
- To modify the page title, edit the value in the ‘Page Title’ field. In my example below, I’ve chosen some words that we can
assume match the keywords/phrases that our fictitious bike company uses. Try
and keep the length below about 70 characters so that, when it gets displayed in
a Search Engine Results Page (SERP), you can see the whole title.
- To change the Page Description, type into the ‘Description’ box. Remember
that your visitors won’t see this on your site. The key to a good description
is again hitting your keywords, but doing so in a way that actually
reads well. If your page gets included in a SERP, it’s likely that the search
engine will use the Page Description as the two or three line description for
your page. Try and keep it to under 150 characters so that it stands a good
chance of displaying nicely in a SERP listing, and the ratio of your keywords to
the rest of the text is not too diluted.
- When you’re finished, click ‘Update Page’ – the settings screen will close
and you’re finished. (You’ll note on my example I didn’t bother with the Meta
Tags at all)
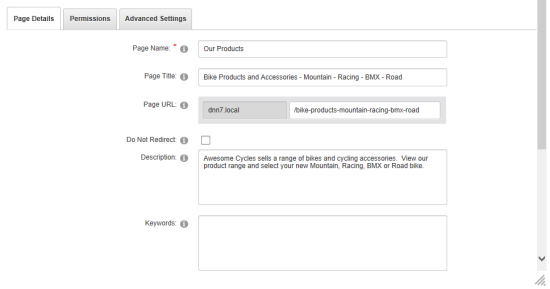
Pictured: Page Settings showing the Page Title and Description Fields.
Overview: H Tags
DNN doesn’t enforce the use of any particular H tag,
so you’re free to edit one into your content however you like. It’s also
possible to define a custom skin for your DNN site that shows a H1 for a
specific page value (such as the module title for a piece of content).
I’d
recommend leaving any ‘H’ tags out of your skin and just making sure that you
define a H1 tag for each separate piece of content that you write (like a blog
post title, for example). But others may disagree with me and just be happy to
define a H1 tag using the page name of each page. I prefer to customize every
bit of content for maximum impact – but this does take much, much longer.
To make something a ‘H1’ in DNN, here’s how you do it:
Use the ‘Edit this Page’ button in the ‘Edit Page’ dropdown to enter edit
mode for the current page.
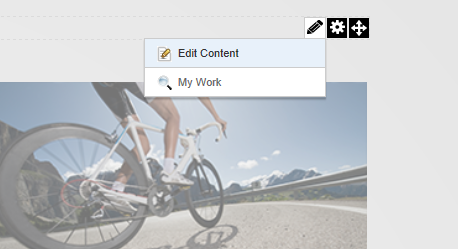
- Hover over the ‘Pencil’ edit icon and click on ‘Edit Content’
- Type in your header (or select an existing header with your mouse)
- Use the style drop down to select ‘Heading 1’.
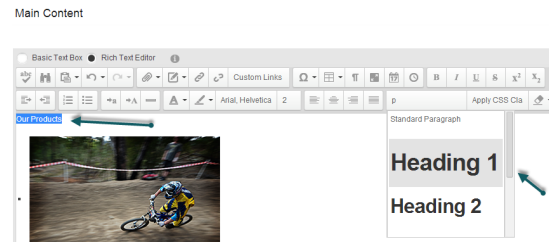
Above: Setting H1 tags using the DNN HTML Editor
You can confirm the HTML is correct by switching to the ‘Html’ view within
the HTML editor.
2) Drop-Down Navigation built in CSS
Navigation by CSS really just means using simple HTML to show the page, and
using CSS to style the menu instead of arcane amounts of script or other
tricks. This assists with SEO by making it very easy for a search engine
crawler to index your site and understand the structure of the site via the
menu. Simple HTML and CSS menus are fast to parse and simple for a search
engine bot to understand. Fast and simple is good.
The great thing about Evoq Content is the ability to swap components in and
out as you need. There is a standard menu system that generates CSS-based menus. But if you don’t like that particular menu, you can choose from a
range of different menu types to swap in to your site. So you are never locked in
to a particular choice.
The standard DNN 7 Skin uses the ‘DDR Menu’ component,
which provides a CSS-based, simple menu system. The default skin provides a
good jumping off point to develop your own skin – or you can purchase a
multitude of skins from the DNN Store.
You can see this in the below image of the standard DNN 7 skin:
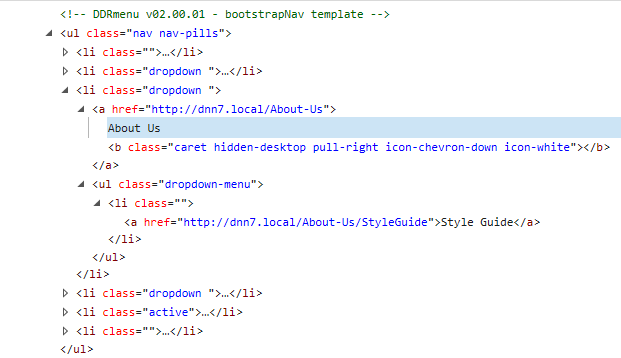
Above: CSS Menu in standard DNN 7 Skin
3) URL Structure
The Search Engine Watch article covers URL Structure for two reasons:the
first being the ability to set static, keyword focused URLs that are ‘sticky’ to
your page. URLs are important for SEO purposes for a variety of reasons and
paying close attention to them yields ranking benefits.
A URL is what is used
to link to your site – whether from an email, social media post, other blog post
or just a plain old web link from another site. Links coming into your site
have a large bearing on the ranking you receive from a search engine – all else
being equal, a site with more links from high-quality sites will rank better.
Paying attention to links is important for SEO.
Any link is made up of two factors – the link
text and the link URL. The link text is what the user sees – the link URL is
what the user follows. Because of automated software and the ubiquity of
copy/paste – sometimes the link text and the link URL are the same. This quirk
of user behavior pays off when you have
simple, descriptive URLs that also
contain keywords
. It benefits your page to be associated with your targeted
keywords/phrases, but it also pays when someone links directly to your page
using the URL as the link text. That is the first factor.
The second factor for URLs is that search engines insist on each unique URL
linking to a piece of unique content. That means you can only use one URL per
page. If you use more than one URL for a piece of content, then search engines consider you to be creating
duplicate
content
. A page with duplicate content issues will never rank as well
as a page that does not.
Because you have to choose a single URL for a piece of content (which is
termed a ‘
Canonical URL’ for the page), the choice of URL
becomes important. Search engines do this on purpose – they want you to choose
the most appropriate URL you can for that page, which means you can’t keyword
stuff the URL and try and make it rank for everything. Because you have limited
choice for the URL, the search engines can then use that as a ranking factor,
knowing you have to choose your URL carefully. If you’re not paying attention
to your URLs, you are
leaving rankings on the table.
It’s no surprise that Search Engine Watch mentions these two URL factors in
their article – because they are both important. Luckily in DNN, elimination
of duplicate content happens for you automatically – the system knows which is
the correct URL for the page, and if you try and reach the page with another URL
(for example, an older one you tried earlier), it will redirect the visitor to
the correct,
canonical URL.
Here’s how to do it:
- Login as an administrator, then navigate to the page on which you want to set the URL
- Using the ‘Edit Page’ dropdown – go into the Page Settings
- Type in the URL you want to use in the Page URL field
- Click on ‘Update’.
If you just changed the page URL, you’ll notice that when you updated the
page settings, you will have been redirected to the new URL. In the image below
(which is the same shown for [1] above), you’ll see I’ve chosen a URL which
reflects the keywords/phrases.
You should choose this carefully – it’s OK to
make a URL which looks a little long and unwieldy – few people type URLs in –
it’s worth it to use your targeted keywords/phrases. If you do have to have a
URL typed in (for example, from a printed advertisement) then I recommend
creating a redirect for that specific URL that goes to your page. That way you
can still have an SEO-optimized URL for the page, but
provide a short, simple
URL for manual entry where needed
.
Above: showing how to set the Page URL. Note that it can bet set to any
‘level’ of the menu structure.Custom URLs do not inherit the parent paths of
the URL, so they can be fully customized to whatever value suits the best.
4) Support for the rel=canonical Tag
The Canonical link element is a way to inform search engines
that a page might be available under a separate URL, but the canonical URL is
the one to index the page for. The Canonical link element is commonly known as
a ‘canonical tag’ because of the HTML tag used to create them. Essentially, a
canonical tag means to ignore the requested URL as the canonical URL, and use
the one listed in the tag instead. This tag is hidden in the HTML of the page
(usually in the header) and visitors cannot see it.
Canonical tags are very useful if small URL changes modify
the display of content, but not the bulk of the content itself. An example
might be a different URL to show different colors of a shirt available on an
e-commerce site – the shirt is the same, but the URL may have "?color=red" or
"?color=blue" on the end.
DNN can show canonical tags in a variety of ways. If you have multiple
domain names in use for a single site, then DNN gives you the option of
specifying the primary domain using a canonical tag. You can also set canonical tags for individual pages simply by adding one to the Page Settings
itself. This gives you fine-grained control over a tag for a specific page.
Finally, if you use, develop or purchase content-display modules (like Blog
modules) then the software can generate the tag for you. Not
only does DNN fully support canonical tags, it provides many ways for you to do
so.
To set a canonical link on your page, here’s what you need to do:
- When logged in as an administrator, bring up the page settings on the page
you’re on, using the Edit Page->Page Settings link
- Switch to the ‘Advanced Settings’ tab of the Settings screen, and scroll
down until you find the ‘Appearance’ section
- In the ‘Page Header Tags’, copy in your Canonical Link Element tag – this is
in the format of:
<a href="http://example.com/your-canonical-url"></a> - Click Update Page when you are done.
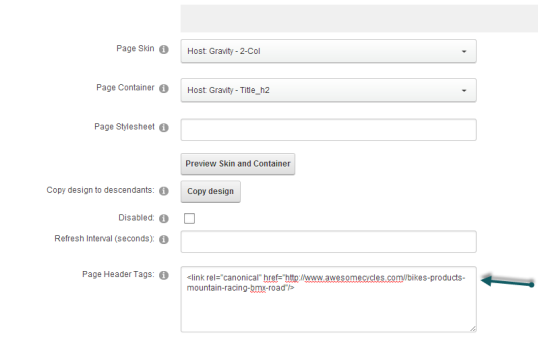
The following image shows the Canonical Link element for the ‘Our Products’
page.

5) XML Sitemap Creation Function
An XML Sitemap (also called a
Search Engine
Sitemap
) is a structured file containing a listing of all the
publicly-available pages on your site that you would like a search engine to
read and index. Often confused with navigation sitemaps – those pages which
show all the visible pages as clickable links – search engine sitemaps are not
seen by site visitors, but are instead read by search engine robots as they
index a site.
A Search Engine Sitemap provides a
fast way for a search engine to read and
understand the structure of a site
. It also includes attributes for a page,
which give the search engine insight on the relative importance of the
page (compared to all other pages on the site) and the frequency of update. Frequency is a suggestion of how often the page should be re-visited for fresh
content.
Creating an XML Sitemap in DNN is easy.
You don’t have to do
a thing, it’s all done for you
. DNN comes with a dynamic
sitemap created by reading the current structure of the site. You can set the
priority of the pages individually for each page. And when you install content
modules to expand the functionality of your site, they have the ability to
contribute entries to the sitemap as well, through an extension point called
Sitemap Providers.
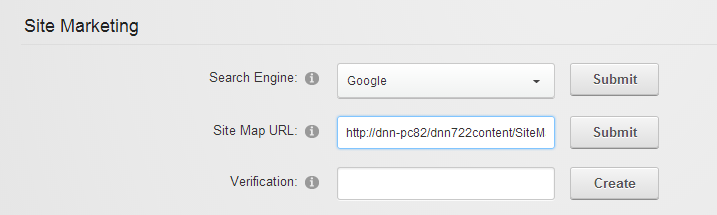
Here’s how to submit your DNN sitemap to search
engines:
- Log on as an administrator, and go to the Admin->Site Settings page
- Find the ‘Site Marketing’ section and expand it
- You will see the ‘Site Map URL’ section with a submit button next to it.
Click ‘Submit’ to submit this to the selected Search Engine.
This sends the sitemap URL to the search engine, who will store it and start
reading it for indexing your site. It’s recommended for you to create a
Webmaster account with each of the listed search engines, so that you can check
to see that your sitemap is being read correctly and that you don’t have
crawling errors.
6) No Frames or IFrames
As the Search Engine Watch article says, hosting frames within pages
makes it harder, if not impossible, for a search engine to understand a site.
The answer for DNN is simple:
we don't use Frames or IFrames anywhere. You can
install IFrames if you want, but they aren’t used as part of the
application.
7) 301 Redirects, not 302
A redirect is an action that a web server gives when you request a URL
that has moved somewhere else. The server
redirects the
visitor to a new location. The numbers 301 and 302 refer to a status code used
to give more context to the redirect. 301 means ‘moved permanently’ and 302
means ‘moved temporarily’.
When you understand the difference, it’s obvious
why search engines will only take action on updating an index if they read a 301
status code on a redirect. The search engines understand that the content for
the old URL is now at the new URL, and so any links pointing to the old URL
should now be considered to point at the new URL. As each link pointing to the
page carries a ranking value, you want to
make sure that the value of that link
is transferred
. This is what a 301 redirect does – and it also makes sure your
visitors don’t get lost if they use an old URL.
For most redirects in DNN, a 301 redirect is issued. This is used when
changing domain names, for when pages are renamed or moved, and for when
administrators purposely create a redirect to point an old URL at a new
location. 302 redirects are used to redirect a visitor to a login page if they
try and access secured content, and for some other temporary redirect purposes. DNN complies with the need for 301 redirects over 302 redirects.
Here’s the steps to create a 301 redirect to a DNN page:
- Make sure you’re logged in as an administrator, and go to the Edit
Page->Page Settings link to bring up the page settings
- Navigate to the ‘Advanced Settings’ tab of the Page Settings popup, and find
the ‘URL Management’ section and expand it
- To create a new redirect, click the ‘Create’ button in the top right of the
URL Management section
- For the Site Alias, by default it will choose the primary alias for your
site. You can also choose any other alias you can configured for your site.
You would choose a different alias when the URL you want to redirect was from a
different alias to the one the site currently uses (oldexample.com/my-url
redirected to newexample.com/my-new-url)
- In the URL Path input box, type the path of the URL as it would appear on
the end of the selected site alias. You don’t need to include the leading / as
this will be added for you.
- In the URL Type drop-down, choose ‘Redirect (301)’ – this specifies the URL
you entered will be redirected to the current page using a 301 HTTP status
- If the URL you wish to redirect includes a Query String (the code to the
right of a ? in the URL), then enter that in the Query String box. This is
optional – you don’t need to enter anything here if you don’t have the
value.
- At this point your URL redirect is finished- click ‘save’. This will add
it to the list of ‘Custom URLs’.
- Click on ‘Update’ to close the Page Settings. Your URL Redirect is now
active and can be tested.
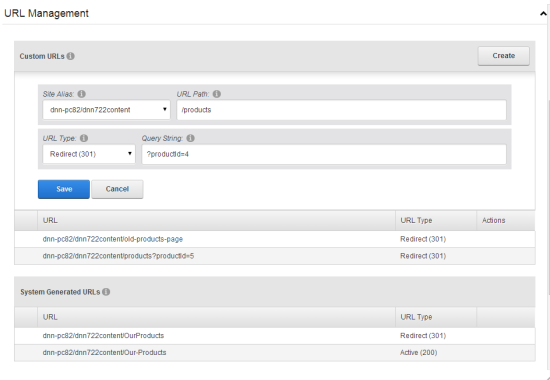
You will also see a list of ‘System Generated’ URLs. These are all the URLs
the system has generated for the page, including any old URLs where the page
name might have been changed, or the page was moved in the hierarchy of the
site. They may also include variations on URLs where the system options were
changed, such as URLs that were applicable in earlier DNN versions. The System
Generated URLs show automatic redirections that are done on your behalf, to
maximize the value of your existing URLs – translating to better rankings
through avoiding lost and broken links.
8) Pagination
This factor relates to the use of the rel=next and rel=prev tags. These
tags help a search engine understand when pages of content are part of a
paginated results set – where there are multiple pages of content for the
results of a search or listing.
DNN doesn’t have a set of paginated results as part of the standard
product. The search feature of the site uses dynamically loaded content
instead of URL-paginated results. However, the extensibility model of DNN means that you can write whatever feature sets you use, and modify the output
HTML to include pagination tags.
9) Custom Alt Tags
An ‘Alt’ tag is the text description attached to an image on a page. These
are used by search engines to understand the contents and context of an image on
a specific page. The Alt tags are used not only to index the images on a page, but also as a way of
weighting the content of
the entire page
. Alt tags carry ranking weight because typically an image on a
page is highly relevant to the content on that page.
It’s easy to set the Alt attribute on an image using the in-built content
editor. Here’s how to do it:
- Login as an Administrator, and put the page you want to edit into Edit Mode
using the ‘Edit Page’ drop down
- Edit the content you wish to change
- When the HTML editor has loaded, select the image, and right-click on the
image to select the properties of the image:
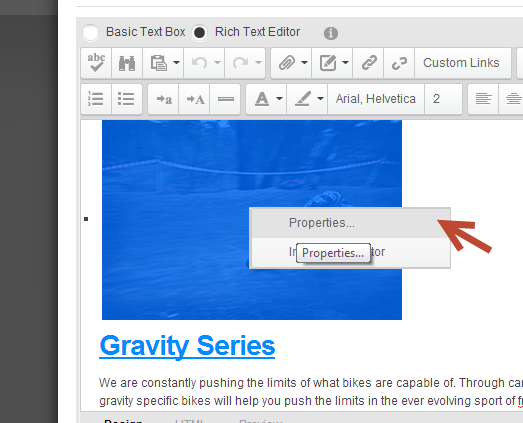
- In the image properties, update the ‘alt’ text field. Choose a phrase which
best suits the image, and which also matches the desired search terms or search
phrase you want the page to rank for.
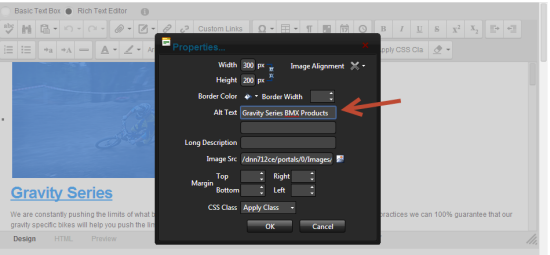
- You can check the HTML for the specific image you are setting the Alt tag
for – here you can see the HTML tag has been updated as we would expect.

- Click on Update to update the page.
Note: perform these set of steps for each image embedded in your
content.
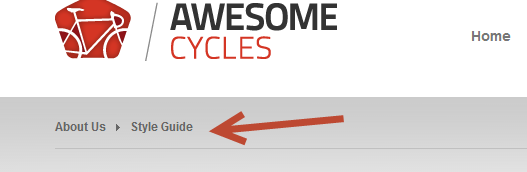
10) Breadcrumb Navigation
Breadcrumb navigation is the practice of leaving links (typically in the
header of a site) which give the visitor visual feedback on where they are
within the site. This gives them an easy ‘breadcrumb’ to follow back to the
higher levels of content and also provides context of the current page.
Like
CSS menus, breadcrumbs are an entirely customizable part of DNN. The standard skin that comes bundled with DNN 7 includes breadcrumb
navigation based on the names of the pages. But it’s easy to change this to
something else, or to write your own breadcrumb system yourself. This is all
done through the magic of skinning – where you can change the appearance and
behaviour of a DNN site without changing the underlying system code.
Breadcrumbs are included in the default skin of DNN, so you can copy from
there. Here’s how that is done:
- The Breadcrumb skin object is included in the skin references
- The Breadcrumb skin object is then included within the skin HTML and the
attributes for the starting level and the breadcrumb separator are set:

- At runtime, the skin object applies to the current page in the hierarchy and
shows the breadcrumb levels including the URLs for the page.

Different breadcrumb layouts can be achieved by varying use of the skin
object – and it’s possible to replace the standard skin object with one of your
own design. Breadcrumbs are great for giving internal links, great for helping
visitors find their way in the site, and help with site SEO.
Conclusion
In the previous ten topics, you’ve read some important factors for optimizing
your search engine ranking – and found out that DNN supports each and every
one. Using DNN maximizes your chances of a high ranking and the traffic that
flows from that. Unlike other CMS solutions that may stand in the way of
achieving results in your search programs, DNN provides clear pathways to
optimize your way to success.
If you have a DNN site, then it is a good idea to work through this list
and see that you are maximizing each one of the areas covered. These on-page
optimizations are simple to do and should be included in the SEO program of
every site. If you have other suggestions or tips for SEO using DNN, then
please share in the comments.
Free Trial: DNN's Evoq Content
Evoq Content is our commercial CMS. It includes a number of SEO features, including Advanced URL Management. Watch the short video below, then sign up for a free trial.
Start your
free trial of Evoq Content.